Images
**Websites are a highly visual medium, so images are arguably the first thing that visitors will notice when they discover your article. Not only do they capture a reader’s attention, but images also play a crucial role in communicating your message quickly.
CORE enables you to quickly add images to your articles, enhancing your content and creating a great visual experience for your readers. Continue reading to learn more about the following:
- Uploading an image
- Image collections
- Adding images to an existing gallery
- Reusing previously uploaded images
Image specifications
Use these guidelines when uploading a new image to your article:
- Accepted file formats: .jpg, .jpeg, .png or .gif only
- Avoid using transparent .png files and animated .gif files.
- Recommended file size: Less than 500 KB
- Max file size: 20 MB
Upload an image
In order to add images, you need to first create an article. We recommend reviewing this guide if you are new to CORE.
To upload an image to your article:
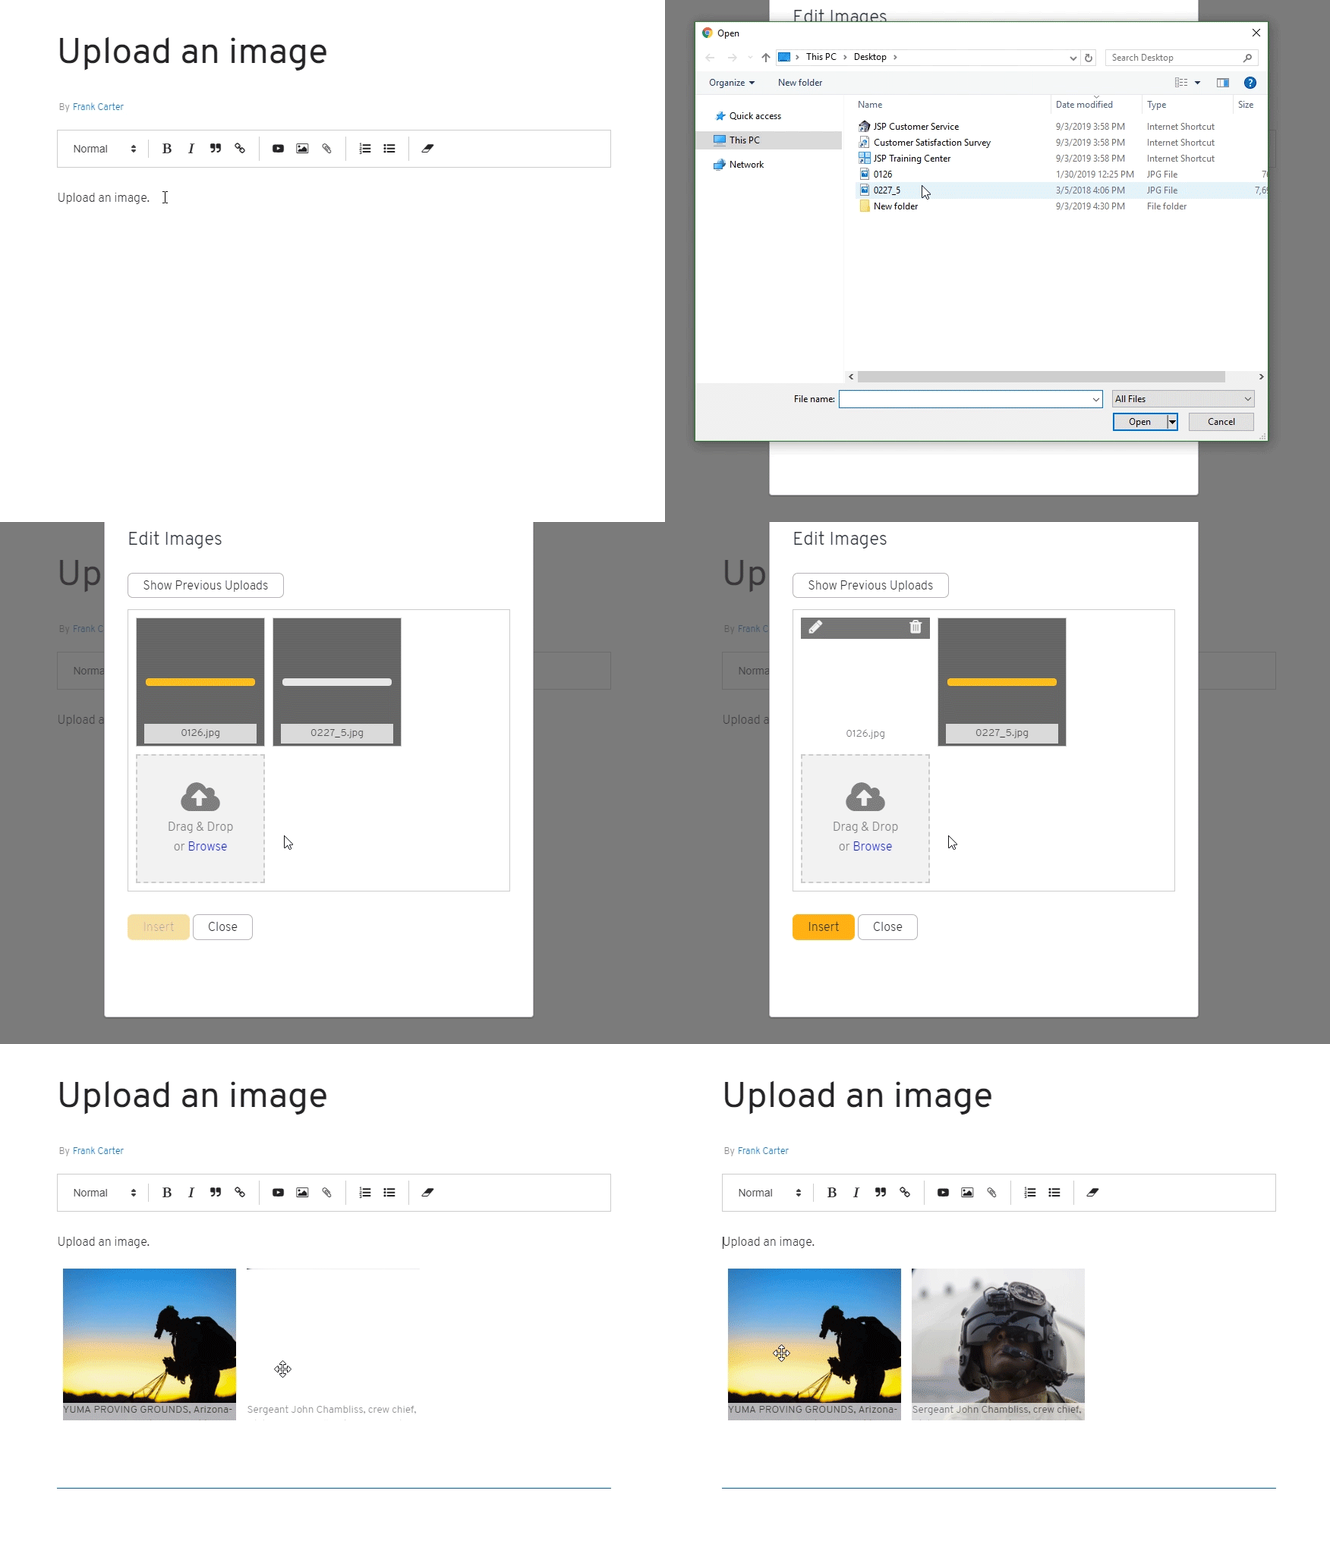
- In the body of your article, go to a new line and click the
in the WYSIWYG Toolbar.
- From the Add Image lightbox, there are two options for uploading a new image(s).
- Select your new image(s) from your computer.
- Drag and drop the files on top of the
Image Upload box. The box will highlight blue, indicating where image(s) can be released.
- Click anywhere within the
Image Upload box to display the Open dialog box.
- Browse and select an image from your computer.
- You can select multiple images by holding down the Ctrl key (or command ⌘ key on Mac) and clicking the other images that you want to upload.
- Click Open to close the dialog box.
- A loading bar will appear to show the image upload progress. This loader will be replaced with a thumbnail of your image once it has successfully uploaded.
- Click the
on your image thumbnail to open the Image Editor.
- Edit the photo title, caption, and credit, or adjust the photo crop.
- Click Save to close the Image Editor and return to your collection.
- You can add or edit additional photos, as well as rearrange their order.
- Click Insert to close the lightbox and place your image(s) in the article.

Your image(s) are now displayed within the body of your article.
Image collections
The upload process outlined in the above section is the same whether you upload a single image or multiple photographs to create an image gallery. You’ll notice a difference, however, once the images appear within the body of your article.
When you upload image(s), you create a new image collection. Think of this collection simply as a container that consolidates your images into small thumbnails, making them easier to manage. You can place multiple collections throughout your article and move images between them to create a custom visual experience. Each collection, regardless of the number of thumbnails in it, contains a toolbar that allows you to edit or delete the images.
Keep in mind your images will not appear as thumbnails when your article is released to www.army.mil. An image collection that contains a single image will automatically enlarge to fit the full width of your article text.
An image gallery, on the other hand, offers more layout options since there are multiple images within the collection. To learn how to display images in a slideshow or grid format, visit Change image gallery layout.
Upload an image to an existing collection
To upload an image to an existing collection:
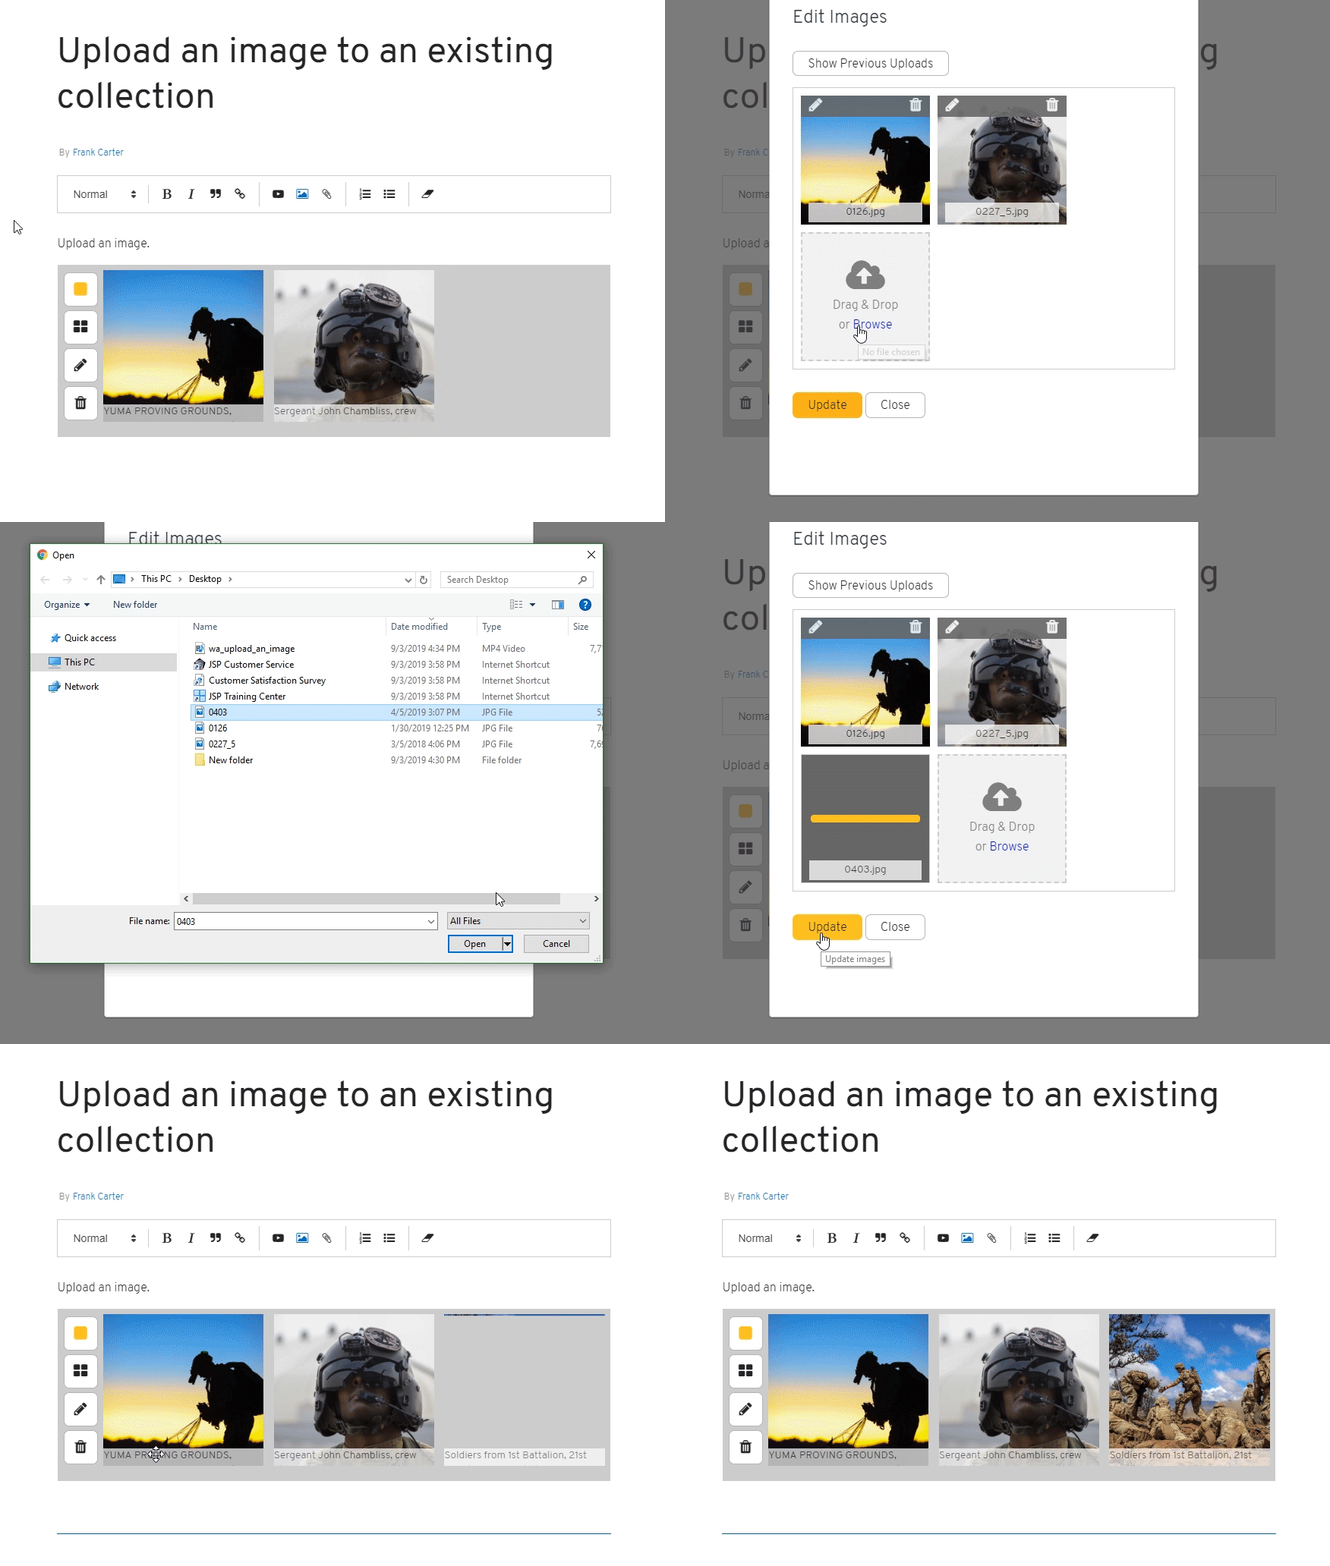
- From your article, click on the image collection you want to edit. A toolbar will appear to the left side of your selected collection.
- Click the
in the toolbar to open the Edit Images lightbox.
- Within the lightbox, you will see thumbnails of your entire image collection followed by a smaller
Upload Image box. Click on the
icon and select an image from your computer, or drag and drop the new image(s) on top of the box.
- A loading bar will appear at the end of your image collection, indicating the upload progress. This loader will be replaced with a thumbnail of your image once it has successfully uploaded.
- Make any edits to the image details, photo crop or image order, as necessary.
- Click Insert to close the lightbox and place your image(s) in the article.

Reuse previously uploaded images
All uploaded images are automatically saved to your article. This means if you remove an image from your article, it is not permanently deleted from CORE. These existing image can be added to any image gallery in your article without needing to go through the upload process again.
Similar to uploading a new image, there are two options for adding a previously uploaded image to your article.
OPTION 1 - Add to a new collection within your article:
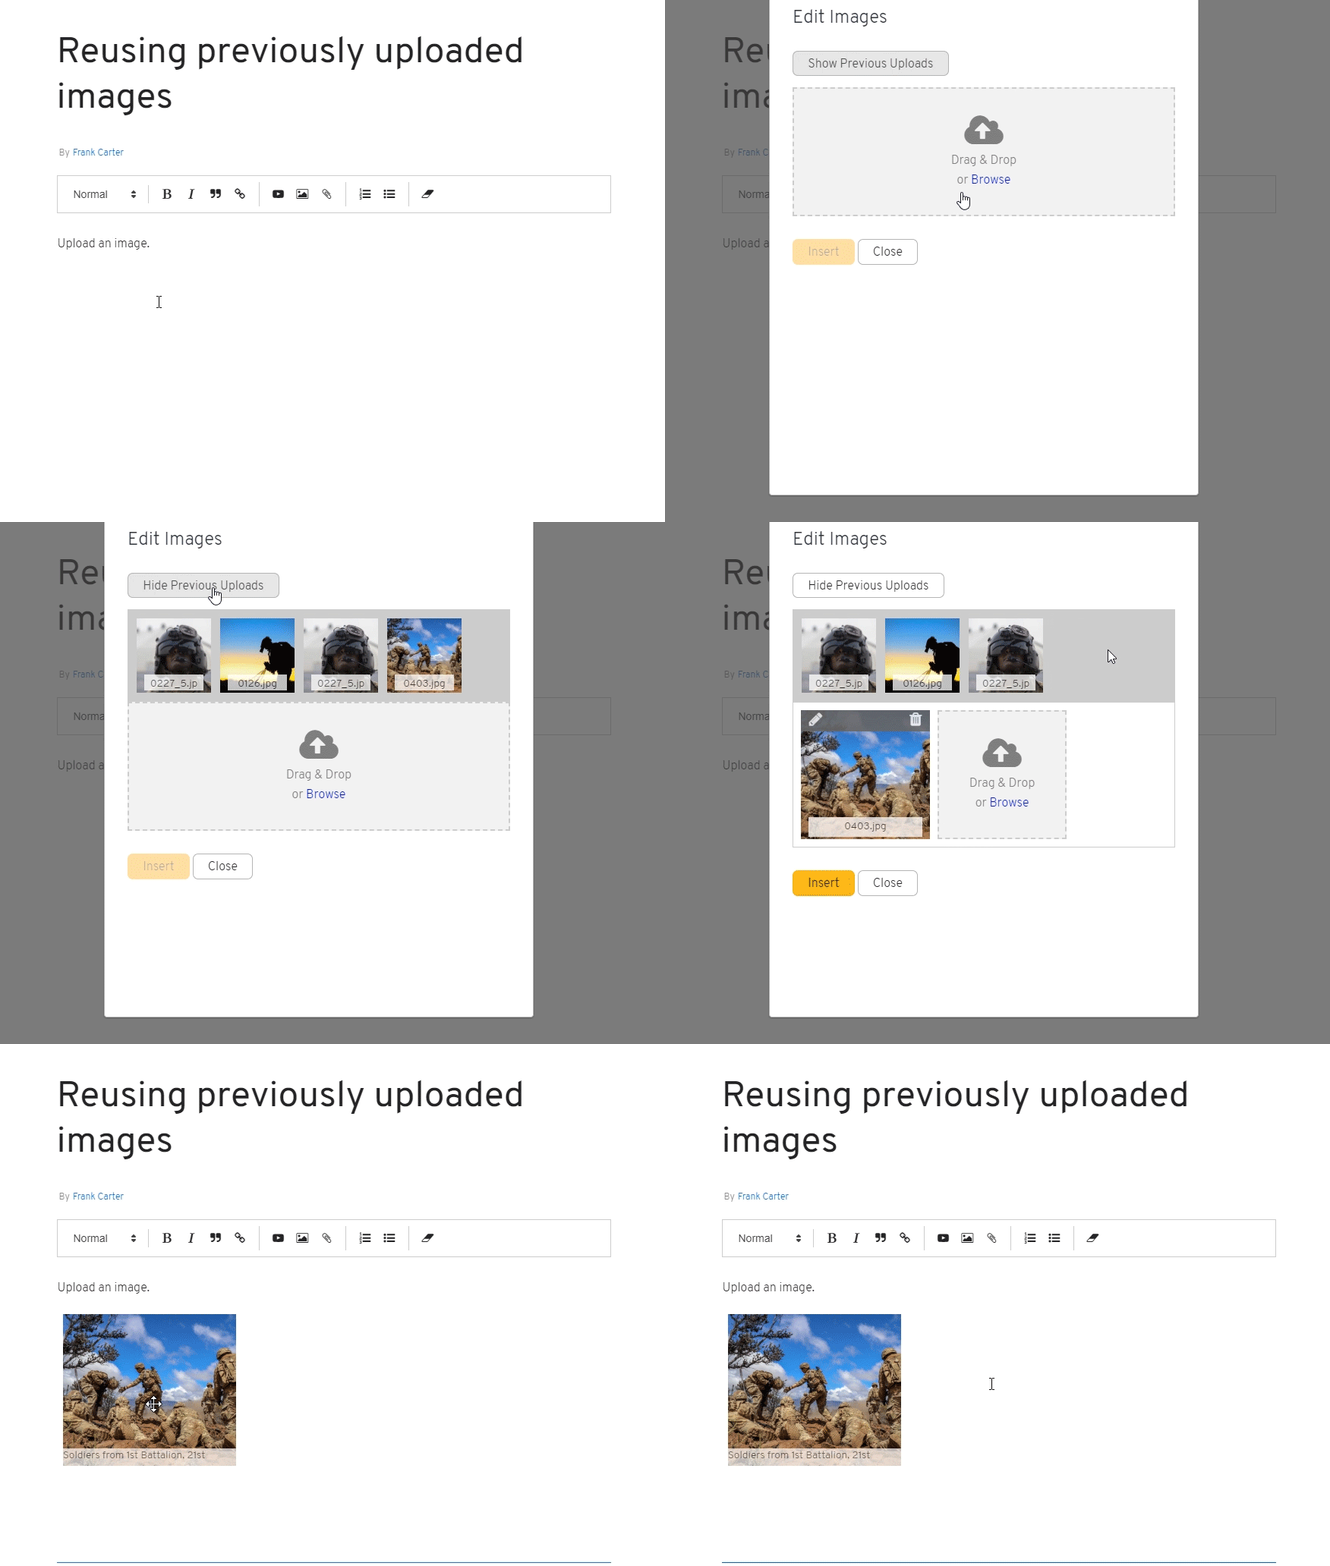
- In the body of your article, go to a new line and click the
in the WYSIWYG Toolbar.
- From the Add Image lightbox, click Show Previous Uploads.
- Hover over the image you want to add. A white
icon will appear.
- Click the
icon to move the image into a new gallery.
- Click Insert to close the lightbox and place your image in the article.

OPTION 2 - Add to an existing collection:
- From your article, click on the image collection you want to edit. A toolbar will appear to the left side of your selected image collection.
- Click the
in the toolbar to open the Edit Images lightbox.
- From the lightbox, click Show Previous Uploads.
- Hover over the image that you want to add.
- Click the
icon to move the image into your gallery.
- The image will appear at the end of your gallery. You can rearrange the order, if needed.
- Click Update to close the lightbox and place your images in the article.
Additional image resources
To learn more about using images within your article, we recommend reviewing these guides:
- Edit images
- Change image gallery layout
- Move images
- Delete image or gallery
- Featured photo
- Tips for formatting images
Frequently Asked Questions
Q: Can I import images from DVIDS?
You cannot directly import media assets using our DVIDS import tool. However, all images associated with a news story in DVIDS will automatically import and display in a slideshow at the top of your CORE article. You can change images to display in a grid layout or move them to a new position in the article at any time.
Q: Can I customize the thumbnail that is associated with my article on organization pages and social media shares?
The first image in your article is the default thumbnail that represents your article anywhere it is used. At this time, you CANNOT change this featured photo. We plan to expand this capability in the future, allowing you to select any image that you want as the thumbnail. Stay tuned!
Q: How do I move images?
Images can be dragged and dropped to new or existing collections that are in the body of your article. To learn more, visit Move images.
Q: How will my article look on a mobile device?
CORE automatically adjusts media assets and text to be responsive on mobile devices. Each element will scale appropriately and stack on top of each other, keeping your content legible and preventing visitors from having to pinch and zoom to read your article. You can preview an article before releasing it to see what it looks like on multiple device sizes.