Documents
**You can upload files and attach them as text hyperlinks throughout your article. When clicked, the file will download or open in a new tab/window, depending on your visitor’s browser. Visitors can also right-click and select Save link as… (or OPTION + click on a Mac) to download the file.
Document specifications
Use these guidelines when uploading a new document:
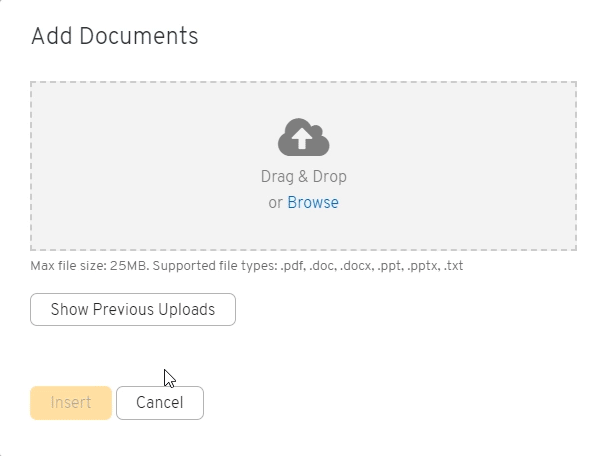
- Accepted file formats: .pdf, .doc, .docx, .ppt, .pptx or .txt
- Max file size: 20 MB
Add a new document
- In the body of your article, position your cursor where you want to insert a link to your document (on a new line or within a paragraph). You can also select existing text in your article to apply the hyperlink formatting.
- Click the
 icon in the WYSIWYG Toolbar.
 - In the lightbox editor, click
 to browse and select a file from your computer. You can also drag and drop file(s) from your computer directly into the Drag & Drop box.
 - Click the
 icon on your document thumbnail to open a Document Details panel.
 - Edit the link text that you want to display within your article. By default, this text will be the file name of the document that you uploaded.
- Click Save to return to the Add Document panel.
- You can add or edit additional documents, as well as rearrange their order.
- Click Insert to close the lightbox and place your document(s) in the article.
Your new document(s) will display as a hyperlink within your article, followed by the file type and size. This file information lets your readers know exactly what they will be downloading when they click on the hyperlink. If you prefer not to display this information, then you can delete it the same way that you remove normal text in your article.
Add an existing document
Once you upload a file, it is saved to your article and can be accessed from your previous uploads. This allows you to place a document in multiple locations within your article or link to an existing file without needing to re-upload it.
- In the body of your article, position your cursor where you want to insert a link to your document and click the icon in the WYSIWYG Toolbar.
- In the lightbox editor, click Show Previous Uploads.
- Hover over the document that you want to add from the list of existing files, and click the
 icon to move the file into your document queue.
 - If you want to change the link text that will display within your article, click the icon on your document thumbnail to open a Document Details panel.
- Click Insert to close the lightbox and place your existing document(s) in the article.
Edit or remove a document link
Once a document is placed in your article, it is treated just like a regular hyperlink. You can inline edit the link text, or select the link text and delete it from the body of your article altogether. Don’t worry, the file is connected to your article so it is still available in your previous uploads, if you need to add it again.
If the hyperlink to your document is within a paragraph, you may not want to delete the text altogether. To simple remove a hyperlink without deleting the text:
- Click the link text in your article to open the Edit Link dialog box.
- Click the
 to remove the hyperlink.
Delete a document
Removing a hyperlink from your article body does not permanently delete the document from the previous uploads that are connected to your article.
To permanently delete a document from your previous uploads:
- Click the icon in the WYSIWYG Toolbar to open the lightbox editor.
- Click Show Previous Uploads.
- Click the icon for the document that you want to delete from the list of existing files.
- Click the icon on your document thumbnail.
- Click the
 in the bottom right corner of the Edit Document lightbox.
 - Click Delete from the confirmation dialog box.
Frequently Asked Questions
Q: I have a new version of my document. Can I replace the existing document?
At this time, you can not overwrite an old version of your document by uploading a new version. When you upload the new version, it will have a different URL.
Q: Can I change the URL for my document?
If you want to customize the URL to your document, you must change the filename prior to uploading it to CORE.
Q: Where do I find the link to my file?
The easiest way to access a direct URL to your document is to click on the link text in your article. From the Edit Link dialog box, click on the document filename to open your document in a new browser tab. Simply copy the URL from your browser’s address bar.